Other Technology | June 10, 2023

DNS servers are vital for the proper functioning of the internet today and are essential for our day-to-day activities, although we actually know very little about them. Our telecommunications provider assigns us default DNS servers, but alternative servers such as those from Google, Open, Cloudflare, or IBM have become popular. These servers offer some advantages and special options. In an attempt to bring some order to this topic, we will explain what they are, what they are used for, which ones are the best, and how to change them in Windows, Linux, macOS, iOS, and Android.
They are not something new, and the reality is that they have been with us for many years, even before many were born. It is true that they were not used in the early days of the Internet since it was a small network with very few active domains. However, their exponential growth became unstoppable, and in 1983, everything changed. Up until that point, a HOST file was used to store all the known domains of the Internet, and from then on, we adopted the Domain Name System.
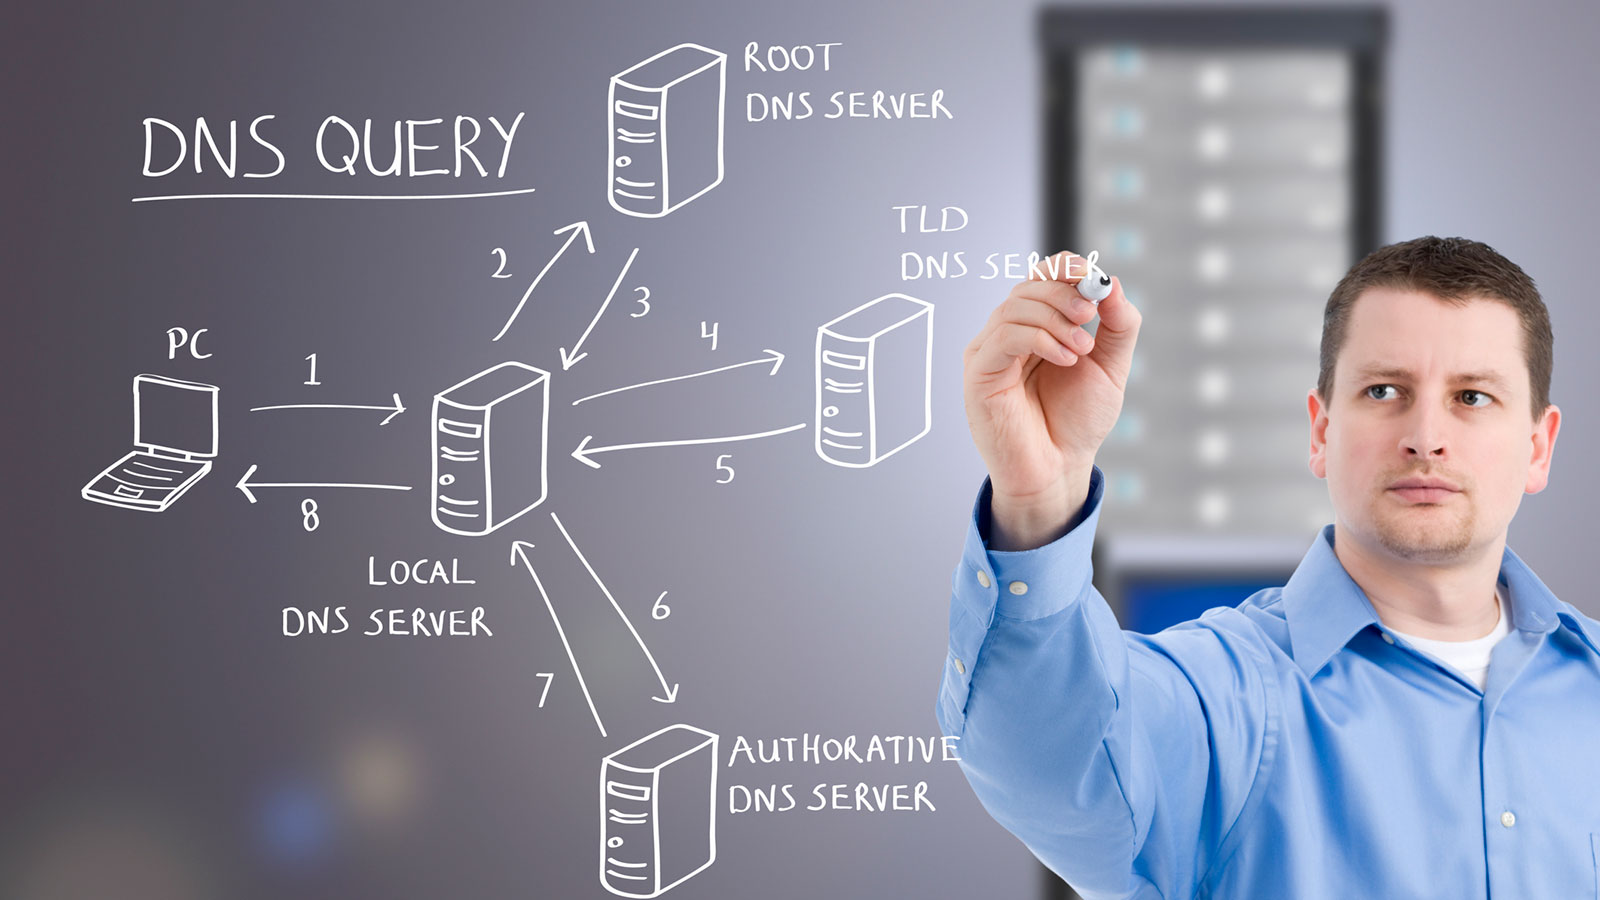
The Domain Name System (DNS) is a decentralized hierarchical naming system for devices connected to both the Internet and private networks that associates information with the domain name. Its main function is to “translate” the domain names we are accustomed to, such as adslzone.net, into binary identifiers associated with the devices connected to the network or IP addresses, such as 84.56.963.21.
Its most important function is to “translate” human-readable domain names into IP addresses of the servers where they are hosted. Since it would be nearly impossible to memorize the IPs of the websites we want to access, this system was implemented to make life easier for users.
In reality, we are dealing with a distributed and hierarchical database that stores information associated with domain names on networks such as the Internet. It is capable of associating data such as domain names with IP addresses and the location of the email servers for each domain.
The use of this system has advantages, such as the ability to change the IP of a specific website without affecting access to the domain or being able to use a Content Delivery Network (CDN) and always connect to the IP address closest to our location for maximum speed.
At the same time, its use makes the whole process simpler since it would be much more tedious to know all the IP addresses we want to access. Likewise, another advantage is its great stability. Since IP addresses tend to change, it would not be sufficient to know them; we would have to constantly update them. In contrast, this system automatically updates IP addresses, saving us this effort and doing it quickly and securely.
As for the main drawbacks, it is worth noting the issue of security since it is possible to suffer DNS attacks that redirect us to malicious websites to obtain our private data.
Some defend the advantages of alternative name servers compared to those of operators. Among the advantages we find in alternative servers (Google, Cloudflare, OpenDNS, etc.), we have:
We can also compare the differences between free and paid servers, beyond the financial aspect, which is more than evident and in some cases truly significant. But aside from that, the truth is that free servers usually have fewer features than paid ones. Typically, a paid server will be more secure and perform better than one that is free. Additionally, the customer support provided by paid servers is much better (generally speaking) than that of free ones. Lastly, servers that cost us money will offer many more customization options than those that are free on a monthly or yearly basis.
There are two other types of DNS that we can consider to have a clearer understanding: public DNS and private DNS. Public DNS servers are openly available to everyone and are provided by an internet service provider or a dedicated provider. Private DNS servers are usually used by companies to allow their employees to access the corporate network. Private DNS servers are used in the private sector, meaning in companies. They are usually better, mainly because they are paid, as we saw earlier.
Now that we know what they are, it’s time to choose the best options on the market. All of them are free, and we have the freedom to choose the one we like the most (or the one that works best for us, as we will see in the next section). Among the best for 2023, we have:
Google Public DNS is one of the best options because it provides fast and secure servers. It does not require registration, so you can use it as much as you need without limitations. There is no limit on requests. It has several protection options to guard against cyberattacks related to the Domain Name Service.
It is a Google service where the IP is deleted after 48 hours, and none of the stored data is linked to your Google account or activity on the network. However, it may collect some data for internal analysis.

This service offers a speed that is not the highest, but still good, with reliable connections. By using Verisign, you will avoid the annoying connection drops that are common with some of these services. They only collect data for analysis purposes. Privacy and security are its main strengths. It includes 13 free servers that provide secure and fast connections from anywhere in the world.
Although it doesn’t have an adblocker, it does protect your computer against attacks and vulnerabilities while you’re using it, safeguarding you from potential cyberattacks during your browsing.

This service has servers in Austria, Germany, the United States, and Singapore. It doesn’t keep activity logs or require you to create an account to use it. It is a popular free solution, but it lacks protection against malicious websites, bots, identity theft scams, or cyberattacks, so you will need to take extra precautions. It stands out for being easy to use and offering a wide range of features. With this service, you don’t need to register or use a DNS resolver since you can do it directly with their IPs.
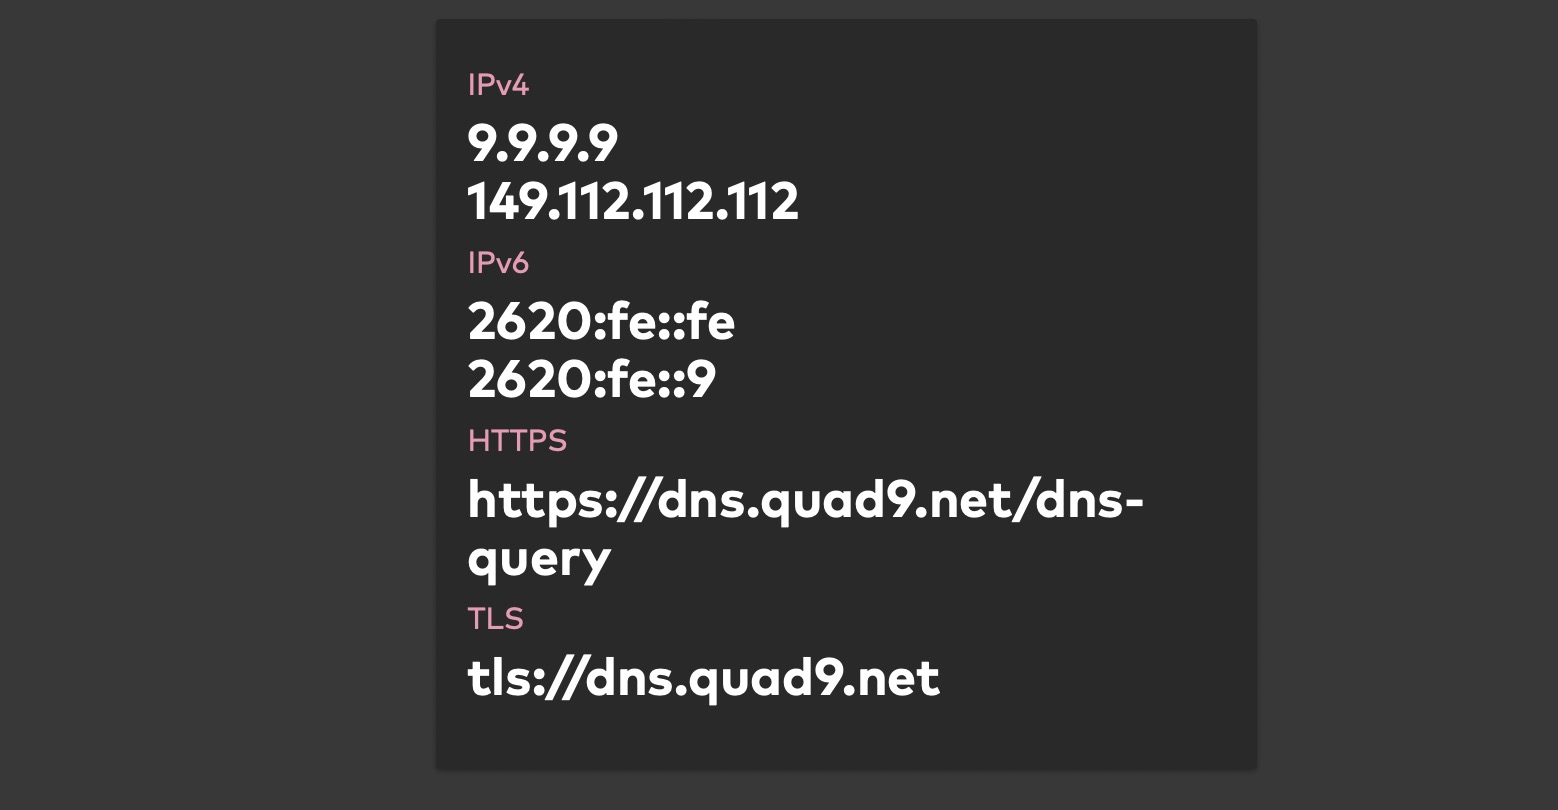
The specific addresses are:

IBM’s DNS service is known as Quad9, which is the name of one of the organizations behind this DNS service, along with IBM itself and other organizations like Packet Clearing House and Global Cyber Alliance. It is a free service, so any user can make use of the Domain Name Services 9.9.9.9, which aims to provide secure and private connections.
Therefore, these alternatives have been designed to offer a safer and more private internet connection. The use of DNS services from certain providers has shown that connections may not be as secure as they should be, especially when using services that handle confidential information.
IBM’s Quad9 or 9.9.9.9 has been developed to mitigate the various risks associated with connecting to the internet, which is crucial considering the numerous threats circulating online. Additionally, they employ filters or blacklists that include websites classified as harmful or dangerous without the user’s knowledge.
All requests are sent through the IBM X-Force AI engine and 18 other databases, all with the purpose of automatically detecting and blocking any potential threats that may arise while connected to the internet. IBM’s Quad9 does not keep records of the requests we make or collect any other type of information, which is something that other popular alternative Domain Name Services, like those from Google, do.
Therefore, if what we are looking for are alternatives that ensure a more secure and private connection, IBM’s Quad9, with a single server under the IP 9.9.9.9, can be our great ally. Let’s not forget that Quad9 also has the IP 9.9.9.11, which adds EDNS Client Subnet (ECS) resolution, providing geolocation resolution so that in the case of CDN/Akamai servers, it resolves to the nearest one.
It’s important to know that IBM has a large number of servers distributed across numerous countries worldwide, and the company continues to work on expanding their server network to offer maximum possible speed. Despite being one of the most secure and reliable Domain Name Services to use, they are not among the fastest today. Other providers like Google, CloudFlare, OpenDNS, DNSFilter, or Norton, among others, still offer faster connection speeds.
Nowadays, we browse the Internet from numerous devices, whether it’s a computer, a mobile phone, or a tablet. Furthermore, each of these devices may have a different operating system, which means that in each case, we have to follow different steps to configure IBM’s DNS 9.9.9.9 or Quad9 and browse in a more secure and private manner.
Therefore, it is possible to configure 9.9.9.9 either at the router level or on each of our devices, allowing us to change the settings depending on whether we are using iOS, Android, Windows, macOS, or Linux. You can learn more about how they work and how to change them on our devices for each system by following the link below.
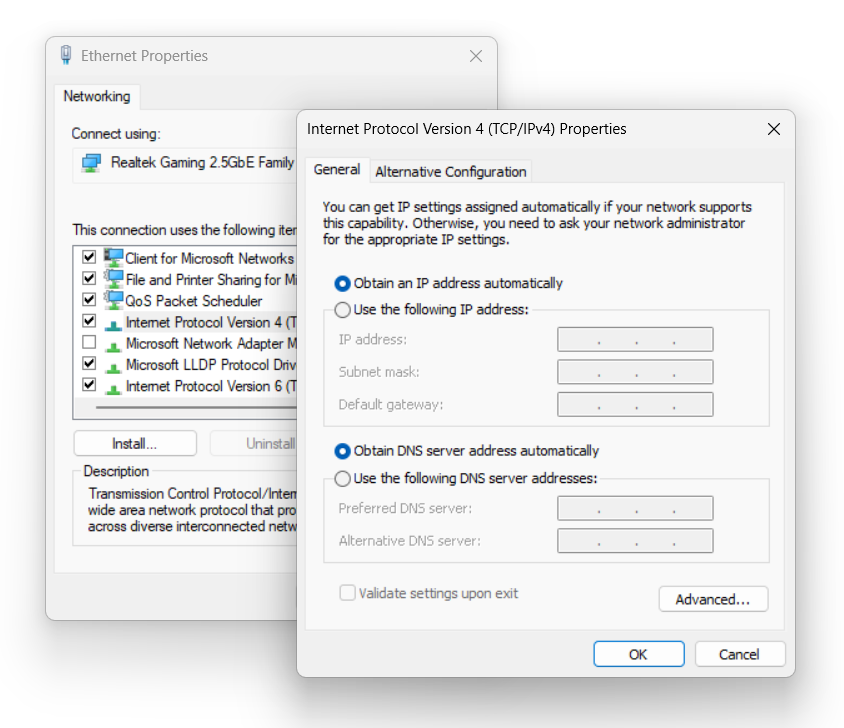
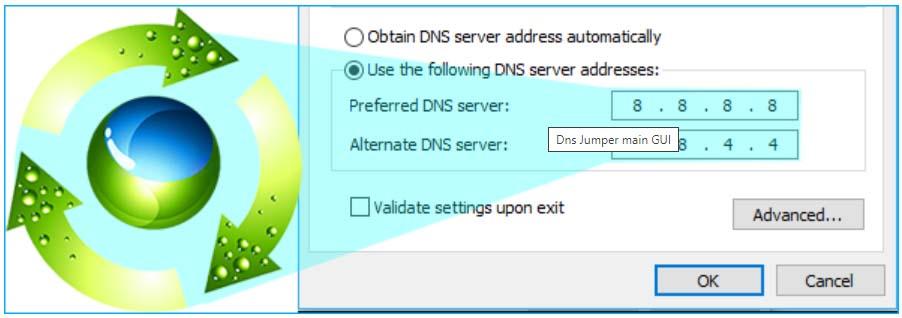
If we are using Windows, we can do it as follows:
This way, we will have this type of DNS in the connection that serves our device with the Windows 10 operating system.
If you enjoy online gaming or prioritize high speeds above all else, this option will be your preference. It offers more than 200 locations worldwide to choose from. Additionally, you can do it with complete security as it also provides protection against Domain Name Service-related attacks. While it doesn’t have an ad-blocking system, by creating a free account, you can manually filter or block content. It allows manual configuration or can be used with their official applications.
As with the others, some data will be logged to improve server performance, but your data will remain private. The logs are deleted after 24 hours, which is an advantage compared to others that typically retain logs for twice as long.

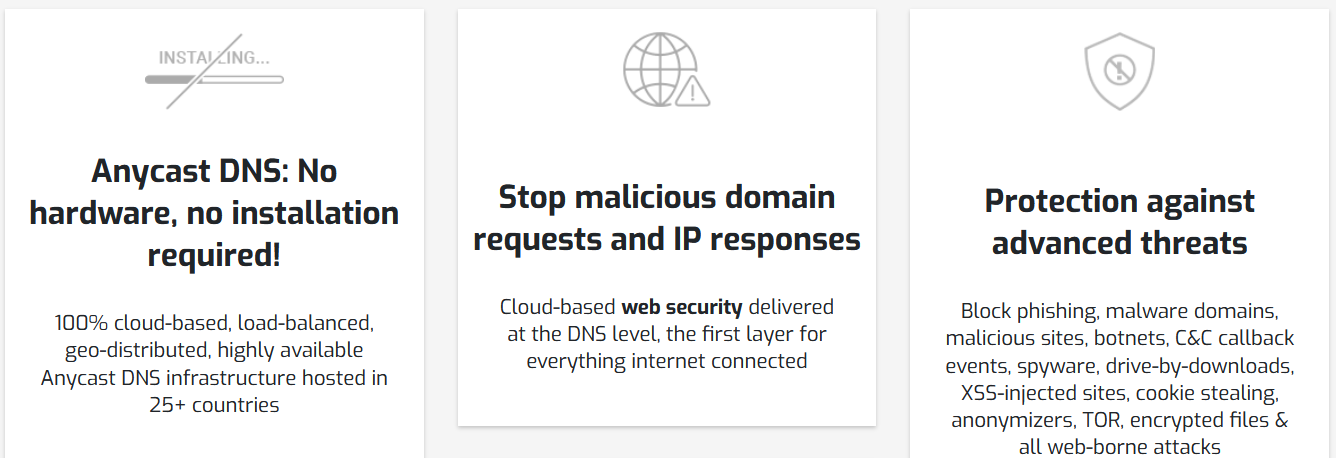
Comodo offers a service that provides you with greater control over web access, protection, and visibility on any device and location with its free secure DNS. It provides a first layer of protection with threat intelligence and can be implemented across the entire enterprise in minutes. In addition to the free service with more basic versions, there are other paid plans available with a one-month trial option. Its free version filters content from over 80 categories and handles over 300,000 requests per month.
All packages include protection against advanced threats, off-network protection, hardware-free and installation-free AnyCast DNS, and much more. It is the best solution for businesses and those seeking maximum protection.
These are among the best public and free DNS servers that provide increased privacy, security, and speed when accessing the Internet. They are an excellent alternative if you are looking for a free service to access internet content such as videos, web pages, and more. You can also enhance your online security with CyberGhost VPN.
These are some of the free options you can rely on, although there are others you should know about and consider trying. We will help you discover the best ones later on.
This free service, led by Thomas Steen Rasmussen and based in Denmark, was launched in 2009 when many of the alternatives mentioned above didn’t exist. Even if they did, explains its creator, recommending the use of Google, Cloudflare, or Quad9 wouldn’t have felt right.
Therefore, they have been managing their own servers since then and have implemented several improvements that place them among the most notable, such as NS-over-TLS or DNS-over-HTTPS. The most recent change occurred in October 2022 when the UDP/TCP port 53 was closed after thirteen years. Only the most secure protocols are currently supported.
The most interesting aspect of CleanBrowsing is that it is a parental control system based on Domain Name Services that allows us to safeguard the online safety of minors at home or at school by preventing them from accessing inappropriate content. One of its main advantages is that, since it works with DNS, there is no need to install software on each device we want to protect. Instead, we simply need to configure our network by defining specific DNS settings. Additionally, if desired, we can incorporate it into our router so that all devices connected to it will use these servers.
Some of the notable features of CleanBrowsing include completely free parental control, easy configuration that doesn’t require expertise, compatibility with any operating system and browser like most private servers, whether used on a mobile device or PC.
Once installed, we can browse the internet with total security, accessing Google, YouTube, and other websites without worrying about adult content. The CleanBrowsing website provides various manuals for assistance.
This DNS service offers various features and is owned by Cisco. Among its most prominent services are its own DNS servers. Additionally, they handle over 620 billion requests every day. Regarding reliability and security, their official sources claim that since 2006, they have already blocked more than seven million suspicious IP addresses and domains.
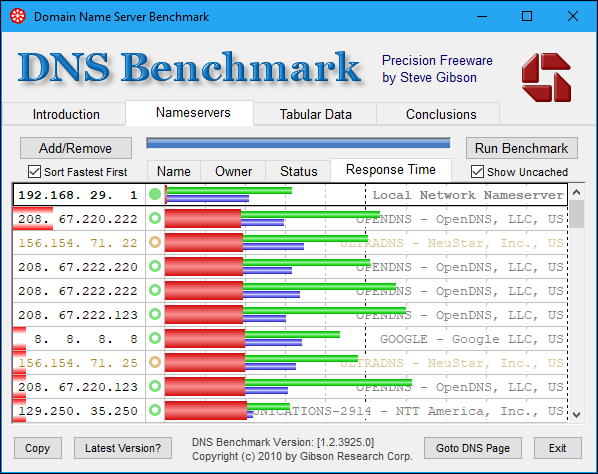
In the previous section, we listed the best DNS servers, but choosing one over the others is not easy unless we delve into their features or security measures. If we prioritize speed and response time, we can use programs to determine the fastest DNS servers for our connection.
In the provided link, there is a comprehensive step-by-step tutorial explaining how to use DNS Jumper, DNS Benchmark, NameBench, and DNS Perf to find the fastest DNS servers that can be used in our specific case. However, selecting the best option is not solely based on speed. Other factors to consider include whether the responsible company keeps records of our connections or visited addresses and whether they use technologies like DNSSEC or DNSCrypt for maximum connection security.
Once you know the best options available in the market and have found the ones that work best for your connection and offer the advantages you are looking for, it’s time to change your DNS settings. This can be done at the router level so that all connected devices benefit from the change, or individually on each device.
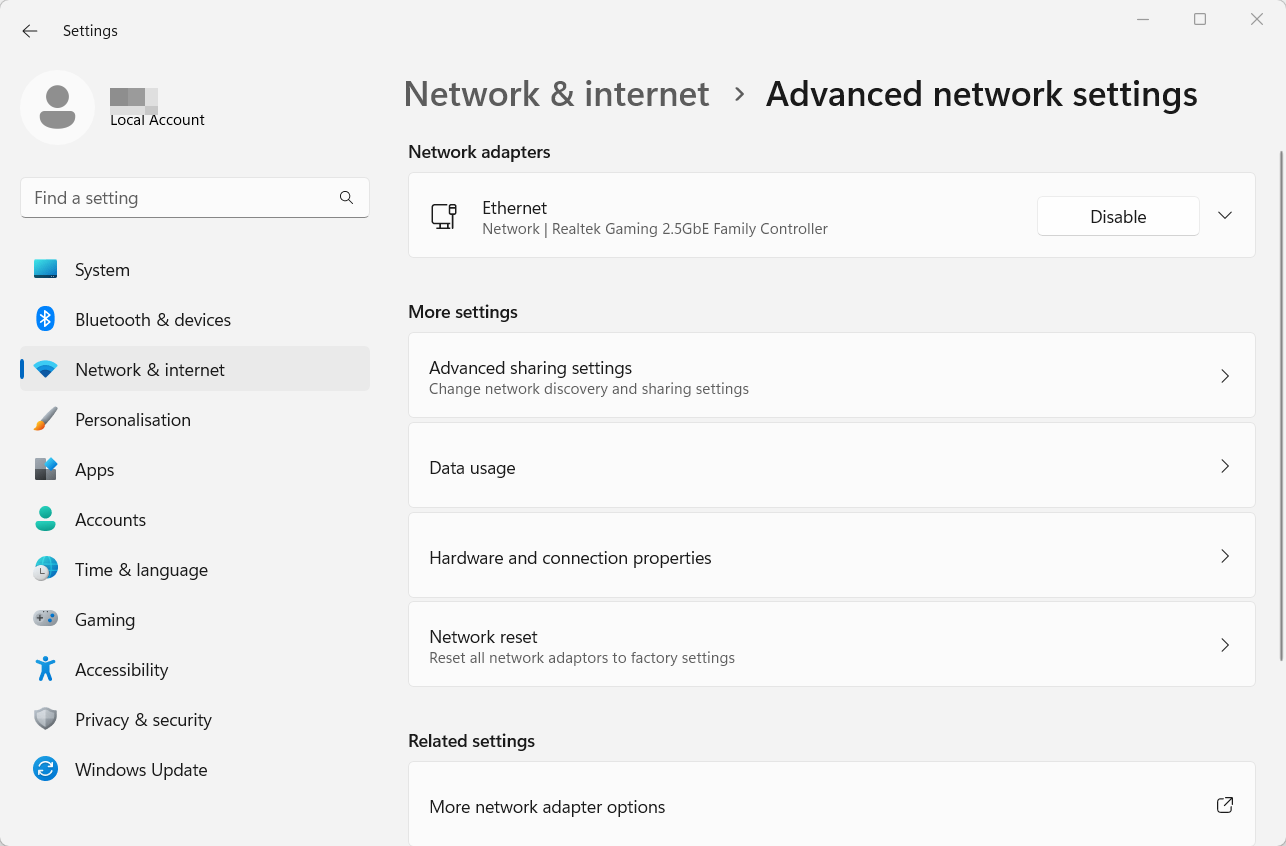
To configure DNS settings in Windows, access the Network and Internet menu within Settings. One way to do this is by typing “Network and Internet” in the search bar of the Start menu, and the shortcut to this menu will appear. Another way is by clicking the Windows icon in the lower left corner or pressing the Win key, then choosing “Settings” (identified by the gear icon). Here you will find access to the Network and Internet menu.
If you are using a Mac computer with Apple’s operating system, the configuration process will be as follows:
The process for Linux operating systems is similar to the previously mentioned cases:
The previously mentioned options are ideal for protecting your PC. However, if you need alternatives different from what your provider offers to protect your entire local network (such as in an office or a home with multiple computers), you will need to make changes to the router. This way, you will be protecting your entire network and ensuring the security of your devices. Here’s how you should do it.
The fastest way to access is through the web interface using an access IP address. You will have to enter IP addresses like 192.168.0.1, 192.168.1.1, 192.168.2.1, or similar, in your web browser (regardless of which one you use), depending on the router. Keep in mind that almost all routers of the same model have a default username and password to facilitate access. Additionally, this access information is publicly known and is often as simple as “admin” / “admin” or similar. With a quick internet search, you can find them, and there are even specialized applications and programs that provide the information for any known model and brand (such as the program RouterPasswords).
Once you know both the IP address and the password, you just have to access the web interface and modify the section corresponding to DNS. Depending on the model, you may find this section under “Internet Settings” or directly in the “DNS” section.
We can also use some third-party applications to change DNS on our PC or mobile device. This way, we can open the specific app and directly access the information we want to change without having to search through the system settings.
If we want to change DNS on our computer, DNS Jumper is one of the simplest applications to use. With just a couple of clicks, we can modify the DNS settings without having to search for this option in the system configuration. It is a free tool with Spanish translation available.
Simply open the tool, choose our network adapter, and select a server from the displayed list or enter one manually. It allows you to search for the fastest servers from the “Fastest DNS” option and has a large library of servers, so choose one that provides good results. Save the changes, and you will have the new settings configured for your connection.
One advantage of this app is that it is portable, so you don’t need extensive resources to use it, you don’t have to install it, and you can take it with you wherever you go. It offers various configuration options to adapt it to your needs. Download DNS Jumper.
If you want an app that facilitates the process of changing DNS on your Android device, then DNS Changer can be a great alternative. It is an app that allows us to easily change DNS to test the speed of our connection and configure those that provide better results. It does not negatively affect your connection or consume system resources, and it provides good results without requiring root access, risking your device, or paying anything for it.
It also allows you to browse privately, maintain security on public WiFi networks, and have a better online gaming experience. It connects with just one touch, without the need to register or log in. If you find that your connection is not as good as it should be, you can try this alternative. It has a speed test function to help you find the fastest alternative for you.
You can use preconfigured DNS lists or use any custom IPv4 or IPv6 server according to your current interests or preferences.
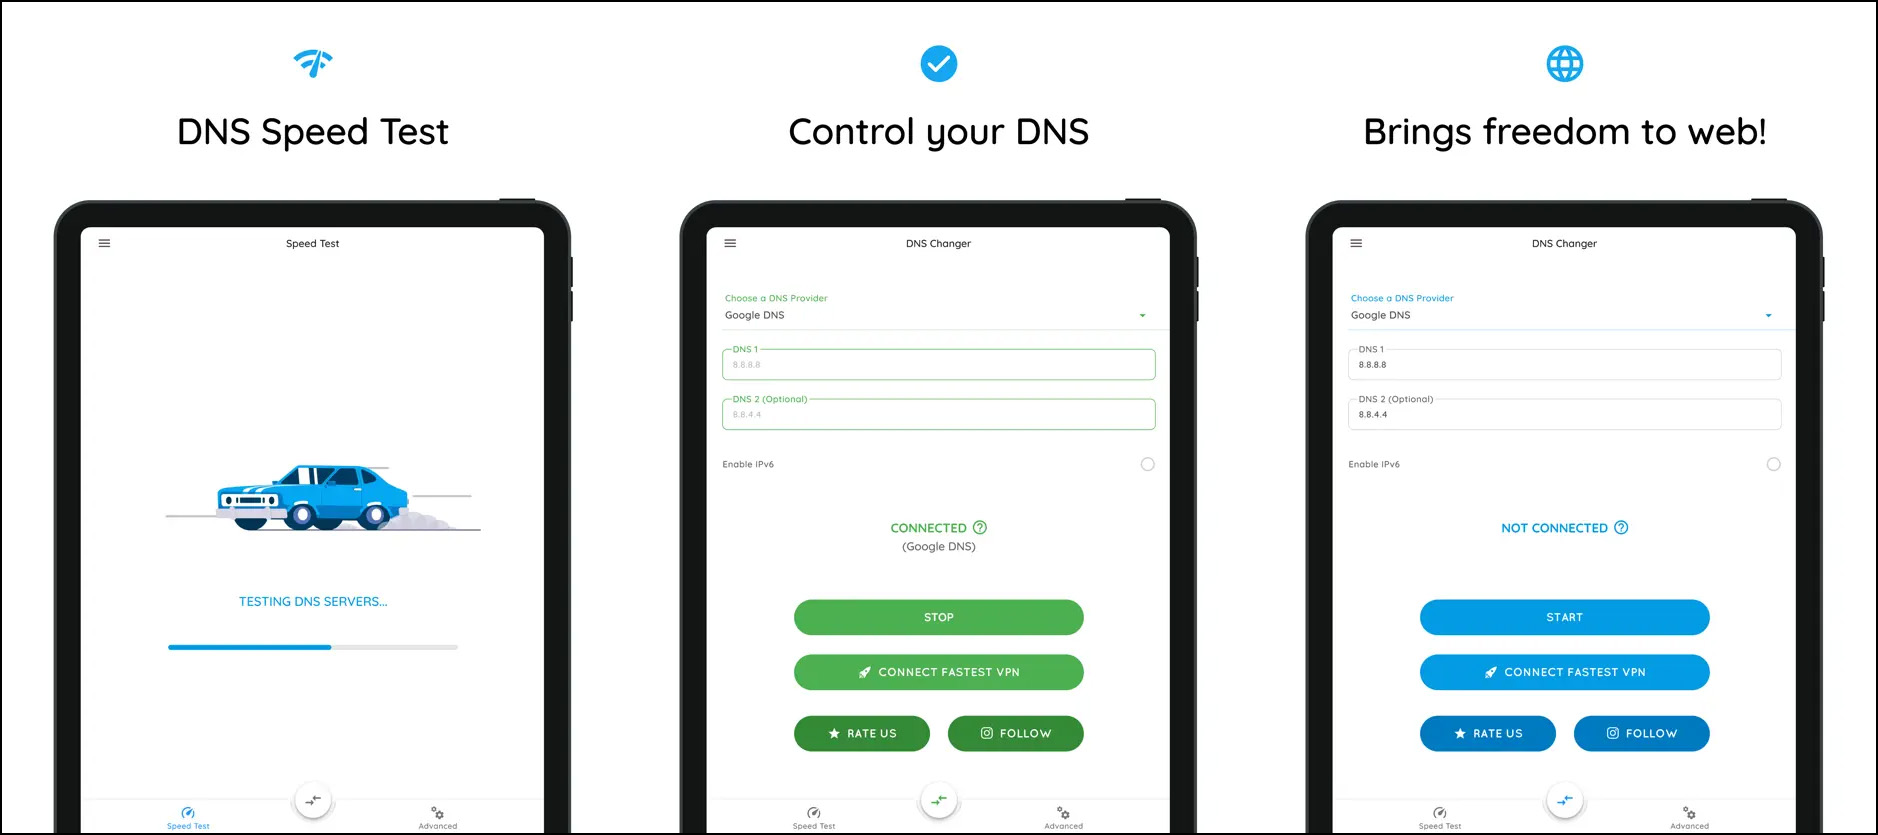
The interface is easy to navigate and allows us to change the DNS of our connection without having to dive into all the options and system settings on our mobile phone. Download DNS Changer.
This is another application that you can install for free on your Android or iOS mobile device. Blokada is an app with several beneficial features. In addition to modifying the server, it blocks all malicious content (ads, malware, trackers) and allows you to unblock restricted access to certain websites. Moreover, this tool helps you save on your data plan, speed up your device, and protect your privacy securely and for free.
Currently, Blokada uses WireGuard, the most advanced VPN protocol, to encrypt network activity and hide your IP address. It also has no bandwidth restrictions and can protect up to five different devices.
The next application allows you to replace and change Domain Name Services. It is a quite innovative app that includes advanced technology for sending requests. It implements DNS over HTTPS, DOH3, and TLS, enabling secure sending of Domain Name Service requests to the server. Additionally, it offers many preset DNS server settings such as Open, Google, or Cloudflare DNS.
The DNS cache stores the results of DNS queries so that subsequent requests for the same addresses can be resolved more quickly. In other words, it stores the corresponding list of requested pages and the IP address of the hosting server.
However, if the DNS cache is not up to date, you may encounter certain issues when browsing certain sites that you were previously able to visit. The cache can become corrupted, preventing the translation of requests from a site to its IP address, so you will need to clear the cache.
All entries stored in the cache are compressed in ASCII format and contain the following information:
You might wonder why it is necessary to manually clear the DNS cache and why it is not done automatically. Well, deleting this information is something that needs to be done to resolve problems when accessing certain websites. In other words, at a given moment, the information stored in the DNS cache may not be correct or may be corrupted, causing problems when accessing a web page.
Sometimes, a website may change its IP address due to a server change, and when we try to access it, we may find that it is not possible because the cached information is outdated. In such cases, we need to clear the cache to be able to browse any site normally again.
Before describing the process in different operating systems and browsers, it is possible to access the data stored in the DNS cache at a specific moment. The quickest and easiest way from any computer is to open the cmd.exe executable, which gives us access to the command prompt.
Once there, you simply need to copy and paste the following command: ipconfig /displaydns. You will then have access to all the data stored in the DNS cache of your operating system.
In addition to clearing the cache, you can also disable the DNS cache at any time if needed for a specific reason. However, keep in mind that this service stores the entire Domain Name System and registers the full name of the computer for this system. If you decide to disable this service, domains will still be resolved, but the results of the queries made during searches will not be stored in the cache, and the computer name will not be registered. Therefore, some processes that depend explicitly on this service will not start.
Routers that provide service to homes or small spaces such as offices usually have a copy of the Domain Name System of your computer stored. Therefore, you can clear it from here.
To do this, you need to restart the router and disconnect it from the power source, as well as disconnect the power supply to your computer. Then, reconnect everything. In a few minutes, the router will be operational again.
Clearing the DNS cache in Windows 10 is quite simple and quick, although it needs to be done from the command line, which may be unfamiliar to many users. It may seem complex, but you just need to copy the commands we will provide. The steps are straightforward, and it won’t take too long.
The first thing to do is open a Run window.
Alternatively, you can directly type CMD or Command Prompt in the search bar of the Start menu, and it will open a window similar to the one shown below.
Once you have the command prompt open, the next step is to type and execute the command: ipconfig /flushdns. As soon as you press Enter, the process of clearing the DNS cache will start automatically. If the command is executed successfully, you can exit the command prompt, and the cache will have been cleared.
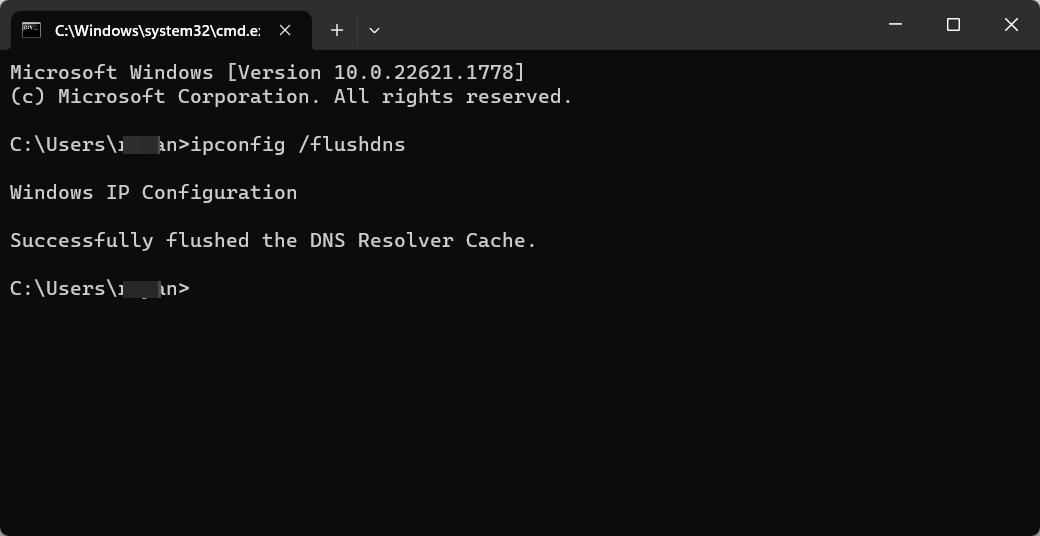
Please note that when using commands in CMD, it is essential to copy them exactly as written in these instructions. Maintain the spaces, slashes, and exact letters for it to work correctly and clear the cache on your Windows computer.
In the Apple environment, clearing the DNS cache will depend on the version of macOS installed. The command to execute may vary, but the steps to follow will be the same in all cases.
The first thing we need to do is access the Terminal.
Once the Terminal is open, we need to execute the corresponding command based on the version of macOS installed:
The command to copy is “sudo killall -HUP mDNSResponder”.
In macOS Yosemite, we use the command “sudo discoveryutil udnsflushcaches”.
The command to use is “sudo killall -HUP mDNSResponder”.
You should use the command “sudo dscacheutil -flushcache”.
The command would be “sudo lookupd -flushcache”.
Clearing the DNS cache on a Linux computer is similar to the process on macOS or Windows. It is not too complicated.
If you have different distributions than Ubuntu, the process is not significantly different. You need to search for and run the command-line interface and enter the following code: “sudo /etc/init.d/dns-clean start”.
Your DNS cache will then be cleared.
Not only can we clear the cache in our operating system, but we can also clear the DNS cache of the browser we are using, such as Chrome, Firefox, or Edge.
To clear the DNS cache in Google Chrome, follow these steps:
The steps to clear the DNS cache in Mozilla Firefox are different from the Google browser. Here’s what you need to do in Firefox:
With the Chromium-based version of Microsoft Edge, you can also clear the Domain Name Service cache at the browser level by following these simple steps: